Name: @SimTran
Location: Vietnam
Project: Automation Testing - creating tests for Special:Homepage (GrowthExperiments)
Mentor: @Etonkovidova
Project summary
The project - Special:Homepage - is a page that provide information for newcomers. The page's UI and functionality are in active development and currently don't have automated tests for regression testing. Adding automated tests would reduce time spent on regression testing and increase overall test coverage for functional testing.
MediaWiki extensions automation framework is based on Selenium framework. Since Special:Homepage is present on mobile, it'd be great to have automated tests cover mobile testing as well.
The tests should be written as Node.js tests.
Project task: https://phabricator.wikimedia.org/T233469
Micro-task 1: Automation testing framework setup (#1)
I. Local machine information
- CPU: 64-bit, x64-based processor
- OS: Windows 10
- Memory: RAM 8GB
II. MediaWiki-Vagrant setup
I followed steps at this link: https://www.mediawiki.org/wiki/MediaWiki-Vagrant
1. Install Git
Get the latest Git from this link and install: https://git-scm.com/
2. Install VirtualBox
Get the latest VirtualBox from this link and install:
https://www.virtualbox.org/wiki/Downloads
3. Install Vagrant
Get the latest Vagrant from this link and install:
https://www.vagrantup.com/downloads.html
Restart the PC when asked to complete the installation of Vagrant.
4. Get the source code and create the machine
- Open Git Bash in the folder which will store vagrant, clone vagrant source code by this command line:
$ git clone --recursive https://gerrit.wikimedia.org/r/mediawiki/vagrant- Go to vagrant folder:
$ cd vagrant- Setup vagrant machine:
$ ./setup.shDuring setting up, when prompted, enter Gerrit user name
- After finishing setting up, boot vagrant machine by this command line:
$ vagrant upIt took almost one hour to complete the first vagrant up
5. Enable additional MediaWiki features
Enable roles: Echo and GrowthExperiments
$ vagrant roles enable echo
$ vagrant roles enable growthexperiments
$ vagrant provision
6. Completion
Check if Vagrant is done configuring the machine by browsing to the link:
http://dev.wiki.local.wmftest.net:8080/
III. Run Selenium/Node.js tests
I tried two methods to run Selenium/Node.js tests:
1. Run Selenium/Node.js test inside MediaWiki-Vagrant
I followed steps at this link:
https://www.mediawiki.org/wiki/Selenium/Node.js/Inside_MediaWiki-Vagrant
1.1. Boot the machine
$ vagrant up1.2. SSH into the machine
$ vagrant ssh1.3. Go to mediawiki folder
vagrant@vagrant:$ cd /vagrant/mediawiki
1.4. Install dependencies in the machine
vagrant@vagrant:/vagrant/mediawiki$ sudo apt-get install chromedriver
vagrant@vagrant:/vagrant/mediawiki$ npm install
There are two problems which I encountered during running ‘npm install’:
- Current Node and NPM versions on MediaWiki-Vagrant machine were older than required versions (Node version: 6.17.1, NPM version: 2.15.12):
A workaround for this problem: update Node and NPM versions:
Install a little helper called 'n'
$ sudo npm install -g nInstall latest stable Node.js version, NPM version is also updated.
$ sudo n stable- Got a symlink error:
It’s because if using a Windows system, npm would create symlinks on an NTFS file system, which doesn't have that feature. A workaround for this problem is using ‘npm install --no-bin-links’ instead of ‘npm install’.
But after resolving these problems, NPM installation still could not be completed, .bin folder in node_moudules was not generated
1.5. Run the Selenium tests
vagrant@vagrant:/vagrant/mediawiki$ npm run selenium
Selenium could not run successfully, got an error: wdio not found because of missing wdio in .bin folder. I still haven't figured out a workaround for this problem, so I moved to the 2nd method: Run Selenium/Node.js test target MediaWiki-Vagrant
2. Run Selenium/Node.js test target MediaWiki-Vagrant
2.1. Run Selenium/Node.js test in mediawiki
I referred from this link:
https://www.mediawiki.org/wiki/Selenium/Node.js/Target_MediaWiki-Vagrant
- Install required tools on the PC
Chrome:
• Install the latest Chrome version: 77.0.3865.120
• Download corresponding ChromeDriver for Chrome version 77 and put it in a folder included in PATH environment variable.
Node Js
• Install the latest version from this link: https://nodejs.org/en/
- Boot the machine
$ vagrant up- Go to mediawiki folder
$ cd mediawiki- Install dependencies
$ npm install- Run Selenium tests
$ npm run seleniumI faced this error when running selenium:

I checked again Chrome and Chromedriver version which I downloaded and installed in the local, both of them were version 77. The workaround is:
• Deleted node_modules folder then installed dependencies again and checked the log
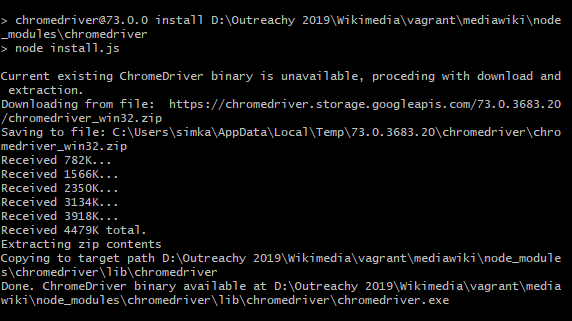
• Based on the log, I saw that there was another ChromeDriver with the same version as in the error message was downloaded and copied into folder ~\vagrant\mediawiki\node_modules\chromedriver\lib\chromedriver. This file was used instead of the one which I downloaded. I replaced this file with the corresponding one to my chrome version, ran selenium test again and it worked.
Another problem I encountered during running tests:
Tried to manually set a password by logging in with vagrant ssh and running mwscript maintenance/changePassword.php --user=Admin --password=vagrant, it worked
2.2. Run Selenium/Node.js test in extension
To get more familiar with running tests, I practiced with Echo extension, still based on steps in this link https://www.mediawiki.org/wiki/Selenium/Node.js/Target_MediaWiki-Vagrant with some small changes and above required tools are installed
- Boot the machine
$ vagrant up- Go to Echo extension folder
$ cd mediawiki\extensions\EchoInstall dependencies
$ npm install- Run Chromedriver in another terminal window:
$ chromedriver --url-base=wd/hub --port=4444- Run Selenium tests
$ npm run selenium-testProblem: the test was paused during running tests/selenium/wdio.conf.js, there were no any error messages afterwards, the test run was remained here
To find out where the problem is, I ran test for GrowthExperiments extension with the same these steps and everything worked well on it.
Because the test was paused at running tests/selenium/wdio.conf.js, therefore problem may come from wdio.conf.js or dependencies which were installed by npm
• First, compare wdio.conf.js file of Echo and GrowthExperiments to find the differences, but in fact they were exactly the same
• Next, I checked dependencies which were installed by viewing package.json files. I noticed that webdriverio version of Echo was older than GrowthExperiments.
• Changed version of webdriverio from 4.12.0 to 4.14.4 (or newer versions) in package.json file, installed dependencies again by the command npm install. Then, the selenium test was run successfully.
IV. Suggestions for improvements/additions to the current documentation
Based on the experiences I gained after practicing with installing test environment and running tests, I have two suggestions for improving to the current documents
1. Selenium/Node.js/Target MediaWiki-Vagrant guide
I made an edit for Selenium/Node.js/Target MediaWiki-Vagrant guide on this link https://www.mediawiki.org/wiki/Selenium/Node.js/Target_MediaWiki-Vagrant.
The changes are:
- Added a workaround note for the error: session not created: Chrome version must be between 70 and 73\n (Driver info: chromedriver=73.0.3683.20
- Added instruction for running tests in extensions, previous version just gave the instruction for running test in mediawiki
2. Webdriverio version in Echo extension
Since webdriverio version 4.12.0 in Echo extension did not work on my machine and it worked well with version 4.14.4 (or later versions), I suggest changing "webdriverio": "4.12.0" to "webdriverio": "4.14.4" in package.json file of Echo extension.
Micro-task 2: Writing node.js tests (#2)
1. Steps in writing Node.js tests for Newcomer Homepage
1.1. Studying required skills
As I was new to Selenium as well as Node.js (JavaScript), I had to start from scratch. It was quite difficult to have a clear direction of what to learn and how to learn at the very beginning. Based on skill description on project, at first, I decided to get familiar with JavaScript, Node.JS and then spend few days for learning Selenium WebDriver. After finishing learning, I reviewed Node.js test code of MediaWiki and realized it was not used Selenium WebDriver. Spending some time studying and searching the Internet, I found out that WebDriverIO was used instead of Selenium WebDriver. So I spent more time for learning WebDriverIO. With basic knowledge gained, I studied Node.js test code of MediaWiki to understand it and get familiar with the coding style.
1.2. Study Newcomer Homepage functionality
To create automation test, at first I need to understand functionality and work flow of Newcomer Homepage page. Based on the documents from this link https://www.mediawiki.org/wiki/Growth/Personalized_first_day/Newcomer_homepage and using the real website, I categorized the page into 5 parts:
- General
- Start module
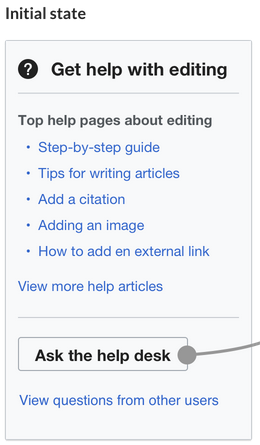
- Help module
- Impact module
- Mentorship module
Test cases were written in excel file first so that I could easily to follow their steps to create automation tests. Besides, it made the tests more manageable and we could not miss any test case. See details in HomePage Test Cases.xlsx file.
Some issues that I encountered during this phase:
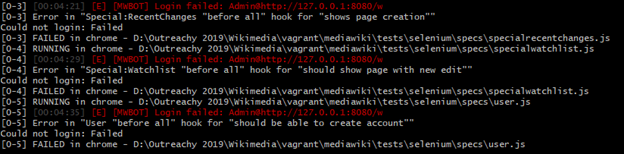
- I’ve got an internal error when tried to log in Admin account
- Sometimes, some modules were disappeared on the web page such as “Learn to edit” in Start module, Mentor module, etc...
- The mockups and documents did not match with the real website, such as Start module, Help module. That was hard to determine if the documents were not updated or the website was built incorrectly, so it was difficult to decide where should be based on to create test cases. Finally, I decided to use this link https://en.wikipedia.beta.wmflabs.org/wiki/ as the reference.
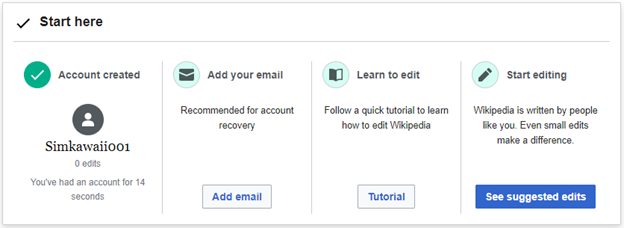
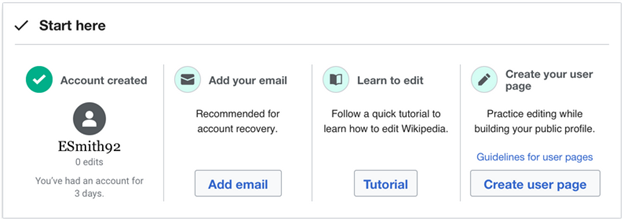
These are Start modules on real website and from the mock-up
And these are Help modules on the real website and from the mock-up

1.3. Creating and running automation tests
From test cases which were created in previous phase, I built automation tests for 2 parts: General and Start Module.
Some issues that I encountered during creating automation tests:
- I tried to save testing time by using the result of the previous test case as input for the next test case. Problem occurred when previous test case was failed so there was no correct input for the next test case, therefore, next test case could not run. So, a lesson learned: Test cases should be independent of each other
- In some test cases, after executing some steps to reach the destination screen, I wanted to check different parts of this screen. For example, after logging in an account the open Homepage page, I wanted to check the homepage title, username, email address, the button and so on… At first, I used one assert to check for each part and then put all these asserts in the same it(). But in this case, if one assert was failed, the remaining ones would not be executed. So my solution was I separated each assert into a separate it() with same steps. But with this way, it took more time to run tests because same steps were repeated again and again in different test cases.
Run automation tests of General and Start module for http://dev.wiki.local.wmftest.net:8080
2. The result
90 test cases in total for 5 parts: General, Start module, Help module, Impact module, Mentorship module are created. Among them, 35 test cases of 2 parts: General and Start module are automated and run and one issue was found from it: [Start-033] Start module title is "Start here" instead of "First steps complete."

Automated tests on GitHub: https://github.com/simkawaii/GrowthExperiments