This is part of the workflow process for the Section Translation onboarding tutorial [T313673].
The onboarding tutorial consists on a set of popups (link to #4) that provide context of the different steps in the translation process. These are the steps supported:
- Initial section title translation
- Highlighted content
- Suggested translation
- Navigation
- Reviewing and publishing
Popup #1: Initial title translation
The first element to translate is the section title and we want to provide guidance from the very beginning. However, since this is not a very representative piece of content, it is a bit risky to assume that users have to edit the translation heavily (machine translation can work perfectly on a very short text). Thus, in this case as part of the onboarding process, the machine translation is shown in advance and the user is asked about the quality of the translation. In this way, we can determine whether to start the tutorial from the section title or the first sentence.
Is this translation for (X) accurate?
 |
|---|
| Popup #1 |
We ask this initial question, and depending on the answer, the user will be able to translate the next sentence or the title itself.
Whether the user decides to translate the title or the next sentence, they’ll be notified of the next steps to take.
- If the user selects “Yes”, a popup comes up with the text: “Great! Your section has a title now. Let’s translate the contents”.
- If the user selects “No”, a popup will appear with the following text: “OK. Let’s learn how to translate the title!”.
Then the user will come across different tooltips explaining the different parts of the interface and what purpose they serve. These tooltips refer to, specifically:
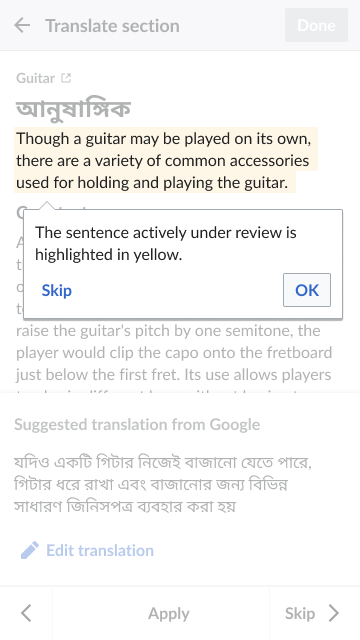
Popup #2: Explains the purpose of the highlighted content
This popup introduces the concept of active sentence. The highlighted piece could be the first sentence or the title, depending on what the user chose in the first opening question (popup #1).
The sentence actively under review is highlighted in yellow.
When the user clicks on OK, it will take them to the next tooltip (popup #3).
Popup #3: Explains the suggested translation and what actions are recommended to take towards it.
- The suggested translation. In this tooltip the user has to try editing the suggested translation whether they are translating the title or the sentence.
This is a suggested translation. Please review and edit it to fix any mistakes you notice, selecting “Edit translation”. Try it out!
Once the user clicks on the “Edit translation” button, they will be presented with the editing screen. Once finished editing, they will face the next popup.
Popup #4: Explains the navigation options.
- This popup refers to the arrows on the bottom part of the interface, explaining what they are for. When clicking “OK” they’ll face the next and last popup.
Once you translate a piece, the highligther moves to the next one automatically. You can navigate sentences and sections using the arrows.
Popup #5: Explains how to review and publish a translation.
- This last tooltip refers to the publishing phase, reminding the user that they still have the opportunity to review the translation they’ve made.
When you’re finished editing, select “Done”. Don’t worry, you can still review your translation before you publish.
When they click on OK, the tutorial ends.
 |  |  |  |
|---|---|---|---|
| Popup #2 | Popup #3 | Popup #4 | Popup #5 |
Userflow diagram
Take a look at the userflow diagram here https://whimsical.com/userflow-diagram-for-section-translation-onboarding-HzyVVC8gtH1Hk7epc8JuJj